Sunday, June 8, 2014

Been awhile....

So it's been a little longer than I anticipated with the blog.  2 weeks is far too long for anyone reading my posts to have to wait.

Today were going to talk about my Sons of Horus. 

I have been working on them slowly since my return from AdeptiCon this year.  Last night I was able to finish my first squad and HQ choice.

Lets start out with the finished products:

 
The squad is boasting 1 more special weapon than it should but my next 6 will even things out just fine from that angle.  With that though let's take a look at the process and I can show you some pics along the way as to how we got here.
 
First once they were assembled we mounted them on corks and hit them with a grey primer and airbrushed on a base coat of Vallejo Model Air Black Metal.


From here I took the Vallejo Model Color Brass to all the details that will eventually be gold.  I then added a heavy dry brush of Army Painter Greedy Gold over the same areas.


At this stage we do a quick once over checking for spots where the brass got over painted and use a Vallejo German Grey to cover it.  We then hit those same areas with Black metal again.  The German Grey allows for a decent base coat as the Black Metal is a beautiful but thin paint and the dark under colour helps.
 
After the touch up we hit the loin tassels with a layer of Chaotic Red Army Painter.  After coating it we give it a wash of Secret Weapon Ruby Red.  This will give the tussling a healthy sheen.
 
We will continue this walkthrough in my next entry...


Monday, May 12, 2014

Warmachine Painting Complete!....for now

So I accomplished my first goal for hobbying in 2014!  My entire Warmachine army is currently painted and based.

So heres my Saturday and Sunday run down folks.....

Saturday was a solid hobby day for me.  We got together at the local store(Little Big Wars) and did some building and painting.  I had picked up the Hover Chasis heavy Vector kit from anothe rlocal shop and brought it along.  I also picked uop both Mother and Father for casters for ym Convergeance army.

I spent 90% of the day getting the jack magnetized and assembling the 2 new casters.  As a note I would not advise anyone short on patience or skill to attempt the Father model as I almost chucked it at the wall myself. 

I ended Sunday by getting crushed at a 15 point game against the Trollbloods that  a local named Obi ran consisting of a Mountain King and a caster whose name escapes me at the moment.  Needless to say the end result is Father Lucent needs to learn how to hit things in melee.  Clearly my 5 missed/minimal damage attacks in a row didn't give him much of a clue.  So after ending the charge he proceeded to be curbstomped by a very large Troll.

Sunday comes....40k League was productive with 3 of us showing and getting a few games in,  At 400 points we found that whose ever tank blows something up first just smashes thru the opposing force with ease and we may need to revisit some restrictions during our next league.

Sunday afternoon I decided to finish out the last of my Warmachine pieces paint jobs.

I started out with a even layer of grey Vallejo primer with the airbrush.  Then I coated them with a thinned out Army Painter Alien Purple, which I found I mixed way too much of and wound up wasting quite a bit as I am not used to ratios and amounts needed for the airbrush yet.


Next up I did my medium drybrush of Army Painter Weapon Bronze.  you can see the start of those results to our right.


Here is a further along look at the process.


Next I picked out several details on each caster with a bit of Army Painter Platemail.
 
Now we highlight the remaining spots on Casters and other units with Army Painter Hawk Turquoise.  Finally we dry brush the Jack and Solos with a bit of the Platemail to blend them in more with the casters but still let the casters stand out.
 
Father Lucent got some extra colors with the staff getting a black handle and some greens and blues to accent the tail and head of it.
 
Mother got a bit of a Deep Blue dry brush to her cloak to make it  stand out a bit fromt he body.
 
Our Last stage is a thin dry brush of Strong Tone from Army Painter and then a bit of sand on the bases.
 
Here is our end results:


Well that is it for today.  Should have another update mid week.
 
-Jerad


Monday, May 5, 2014

Sore Hands and Hobby Goals

So I was listening to the 100th episode of Independent Characters today....(http://www.theindependentcharacters.com).  If it is relevant I do discuss some content of the episode here so please go listen if you don't want it spoiled.  Otherwise please read on.

At one point during the episode, Carl, who for the record is an amazing guy who I had the distinct pleasure of losing to at Adepticon this year, began to discuss the goals he and the others had for their hobby this year.  Now, this topic got me thinking that it would be a good idea to make a post outlining my goals for the year.  Also, this gives me a place and audience to be accountable to.

Below I will outline my goals and into he near future I will get a page added to the sidebar with detailed progress of each of them.

So this year we are going to have a theme:

Nothing is Fielded unpainted in a Warhammer game again!

So where does that leave me for goals?

1- Get my 2500ish point Sons of HORUS assembled and Painted.

2- Paint the remaining Knights of Penance(Dark Angels).  Probably about 2000+ points.

3- Built and convert and Paint project "Dirty Dozen".

4- Finish out my 2000 points of Warriors of Chaos.

Now for non Warhammer we hate these goals:

1- Get the rest of my Warmachine painted... All 11 remaining models.

2- Paint my entire 1800 point Late War German army for Flames of War.

3- Finish custom paint jobs on all my X-wing ships.

So by year's end all of my models should be painted.  This also means I really shouldn't buy more unless I want more work lol.

Tactical Squad Box

I took some time last night to finish painting and basing some tactical marines that I won at Adepticon.  As a side note I got them for my amazing showing at the Exterminatus event...in which I wont he prestigious, Get a New Game award.

Well to cut to the chase the new box they came out with when they did the new codex is just stellar.  I was able to pretty much have any option with it.  I added a Melta gun and gave the Sergeant a Plasma Pistol and Power sword... which you will soon learn is my standard for squad leaders and veterans. 

So for those unfamilar with my normal paint scheme this is a standard marine:
 
Not the best pic I know but it gives a good idea for now.
 
So let's start off with my process and I can show you where I varied on these models.  As a note at some later date I will revisit this list with some detailed pics along the way. 
 
1.  I start with a nice event base coat of Army Painter Desert Yellow.  Usually I have been hitting this with their amazing spray primers which work great.  Though once I run out of my current can I am switching to just basing with an air brush. 

2.  I go and hit any spots that were a little uneven with a brush to ensure everything is Desert Yellow.  Depending on the model and whether I assembled before painting this step is quick or more involved.

3.  I Hit the knee pads, shoulder edging and any helmet details that I want orange with a Army Painter Lava orange.  This step I try to keep clean lines but I don't worry if I miss a bit as I go back with Desert yellow during a final touch up later.

4. The next stage is some Gun Metal from army Painter.  We hit all the weapons, backpacks, jump packs and any other details that need this picked out.

5. Next we dry brush the pack pack/jump packs with a heavy Army Painter Weapon Bronze.  This gives use a bit or a tarnished look and blends well to the armor's basecoat.

6. The purity seals and ropes are now painted Wolf Grey.  Then depending on how much shift in colours from edge to center I want I dry brush a medium dry brush of these colours: Electric Blue, Ultramarine Blue and Crystal Blue.  I will vary there order a bit and alternate back to same colours to get a varied look to the cloth.

7. I do a quick layer of Greedy Gold on all the actual purity seal metals and on some of the back pack emblems to give them a bit of differentiation.

8. The belts and Aquillas get a simple layer of Shining Silver.

9. Bolters get some black on a few key areas to help the other spots kind of pop.

10. Any leather straps and grenades get some Leather Brown.  I usually just make this a very flat coat as the wash later will give it depth.

11. Now we touch up the Desert Yellow.  I go back to each figure in my batch and touch up any areas where current colours have hit outside where I wanted.

12.  Almost done!  We take to our skin tones now on the Sergeants.  This is kind of a free form colour choice.  I use a mixture of Red Leather from Vallejo and Sunny Skintone from Vallejo.  The exact ration varies between a 3:1 and 1:3 depending on how I feel the skin should look on the batch.  I follow it with a very light drybrush of Barbarian Flesh and /or Elf Flesh from Army painter, again varying to allow for uniqueness.

13. The eyes get a quick hit of Army Painter Alien Purple.

14.  Finally I give the whole model a wash from Army Painter Strong Tone which gives it a strong worn look.

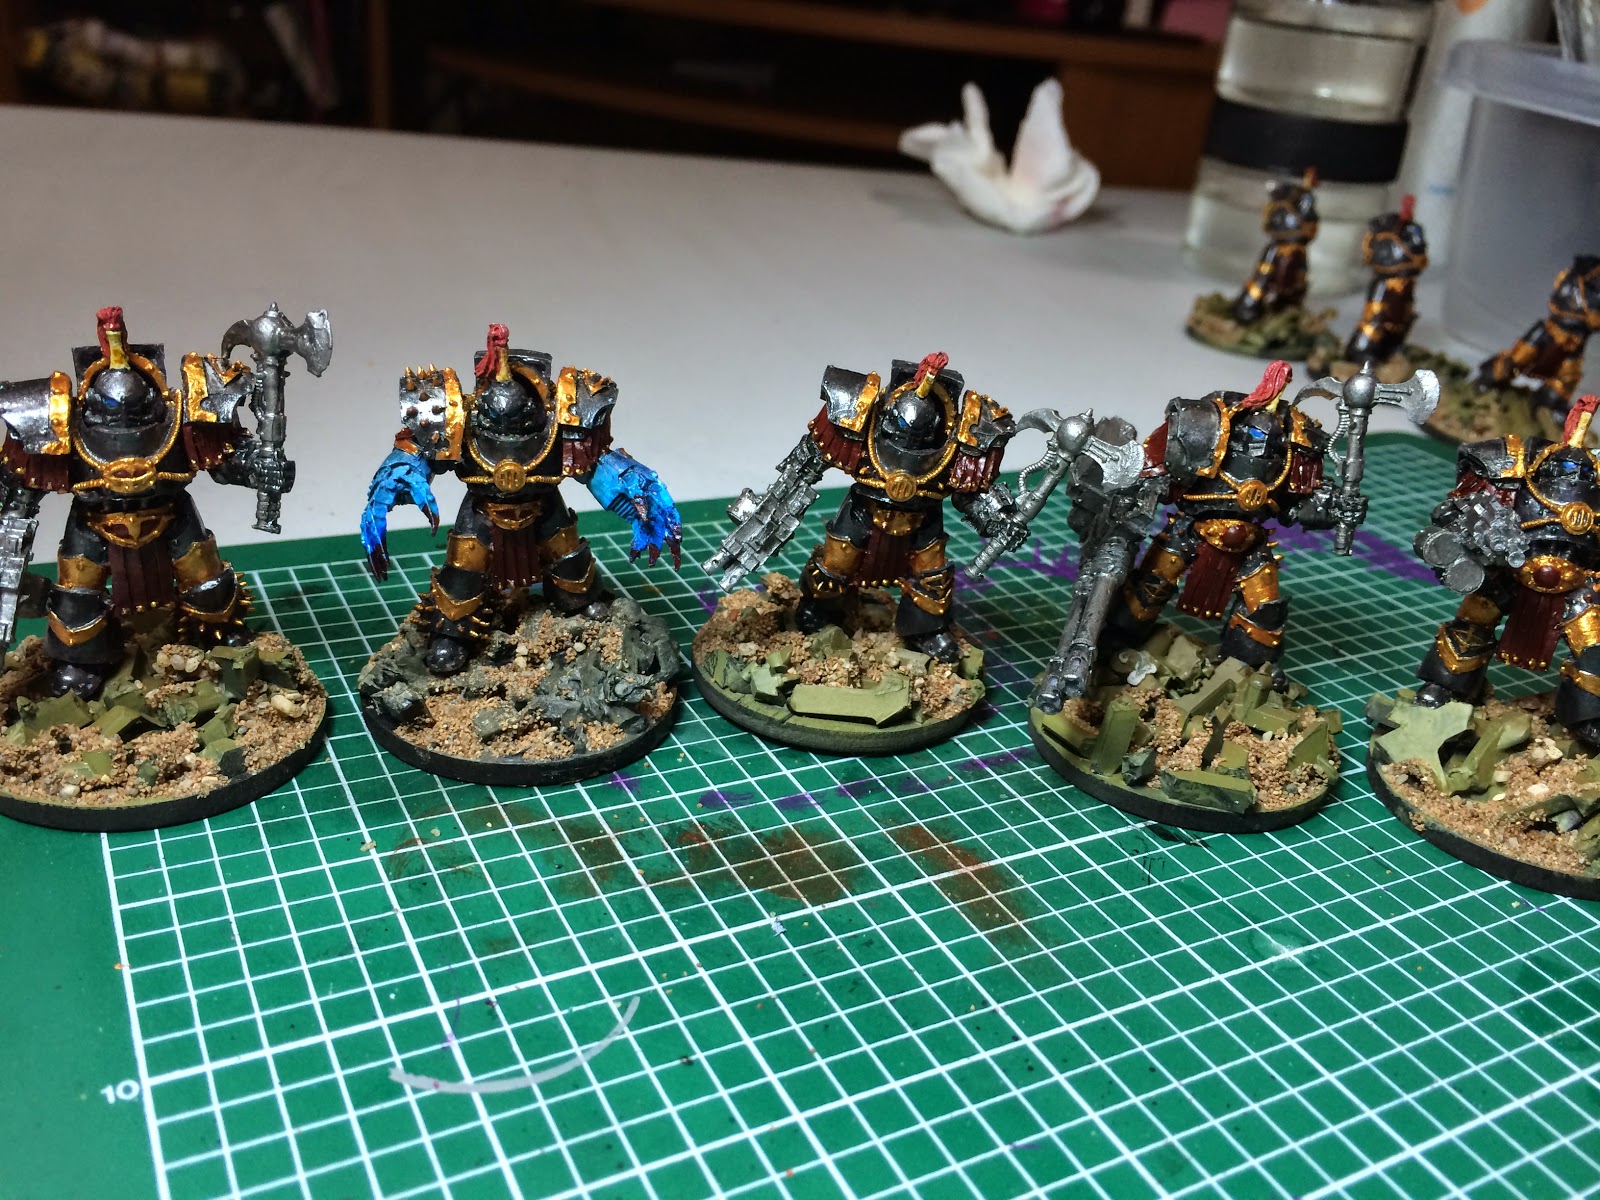
Now that is the normal process.  here is what we cyhanged ont his batch:

1. The Right Shoulder and the Lower Leg Plates get a nice navy blue colour.  We got there by starting with a Vallejo Army Grey and then gave it a even coat of Secret Weapon's Cool Grey wash.

2.  We went with Silver on the helmets and also on the Sergeants chest piece.

3. The Eyes got a 2 tone of Army Painter Crystal Blue over the top of Hawk Turquiose.

4. The guys with no helmets got a Army Painter Pure Red.

5. The Melta gun got some Secret Weapon Amethyst wash to give it a tempered look.

So Here is what we ended up with:


Well for today I will end this as it took me about 3 days to actually hammer down these between everything I had going this weekend.

Thursday, April 24, 2014

Unexpected Results

So now that I actually got around to my first post it isn't what I expected.

Wednesday I wound up setting up a Flames of war game at the local shop, Little Big Wars.  So Tuesday night I built my list which consisted of 2 Tigers, 2 PAK 40s and 9 Half tracks.  Seemed ok but 1 problem.  I only had 5 and the other 5 sat unbuilt on my shelf.  So late Tuesday I grab down a box of Plastic Solider company half tracks and set to work.


So I started in on a batch of 5 more...

These kits by the way are just great.  Lots of detail but not too much.  They leave the option to keep them simple or have a decent amount of stowage on the vehicles. 

So clipped down and did some gluing in hopes I could get enough done to be playable Wednesday without losing too much sleep.


About an hour into the process I had everything for the chassis cleaned and sorted.  There is quite a few pieces and I suggest utilizing the beds of the vehicles to keep stuff together as you clean and sort.


So about an hour later we got to have the benches and drivers Al good.  Took a bit to clean the parts as some are quite small. 

Also took some careful work as a lot of them only go 1 way and on a certain side.


Lets stop and make a note on mold lines and 15mm scale....

If it is a visible vehicle part I will clean it.  If its a solider and a minor line it can stay.  It's that simple in my book.  I do clean all the contact points but other than that I am kind of lenient as far as what lengths I will go to.

Now back to our regularly scheduled hobby time....

So what you see above is my stopping point for Tuesday night.  Though Wednesday at lunch and my break I got the tops of the vehicle and the gunner and both Machine Guns attached so only stowage and passengers remain at this point.  Though unfortunately there are no more progress pics.  Once I get back to working on these I will post some fully assembled pics and once they are painted I will post them as well. 

This is a project where I am still debating getting them outsourced or trying to fit them in to my schedule.  Thoughts from the readers?

Sunday, April 20, 2014

So, let's kick things off here. 

To start with lets go with why I am doing this.
  1. I want to chronicle my painting progress for the hobby as a whole.  I want to watch and share my progress with an audience.
  2. I want to share my game progress and growth of each army I collect.
  3. I want a place where I can log my painting as far as what colours I use for figures and how I mix the colours to get the look I want.

Now that we covered the why, let's look at the what. 

What can you expect to find in my blog entries:
  1. Painting Progress:  Pictures and diary style entries of my painting.
  2. Army growth:  The choices I make to grow each army and the items I get assembled.
  3. Games Played Overviews:  Short overviews of the games I get to play.  Not so much battle reports as I don't really keep good game notes too often.
Well for now I will cut out.  Expect another update tomorrow or the next day.

-Shadowh3ll